Unreal-Examples
Daniel Bortfeld - UE4 code examples
Project maintained by OgoxHammerschild Hosted on GitHub Pages — Theme by mattgraham
Unreal-Examples
UE4 code examples
Content
Unreal Examples
The following examples will demonstrate some basic functionalities to expose functions and variables to blueprints. The resulting blueprint nodes can then be used by other members of the team like e.g. designers in order to create game logic on top of the code created by programmers.
UFUNCTION Specifiers
BlueprintPure
Expose a single or multiple values from C++ to Blueprints
// .h

private:

UPROPERTY()
  float myRange;

public:

// specify a return value to return a single property
UFUNCTION(BlueprintPure, Category = "Range")
  float GetRange();

// use &-parameters to return multiple properties
UFUNCTION(BlueprintPure, Category = "Data")
  void GetData(float & range, FString & name, int32 & level);
Result:

Use UPARAM and the DisplayName specifier in case you have shortcuts or unclear names for your parameters
// .h
#include "InOut.h"

UFUNCTION(BlueprintPure, Category = "Data")
  void GetData(
    UPARAM(DisplayName = "Range") float & rng,
    UPARAM(DisplayName = "Actor Name") FString & name,
    UPARAM(DisplayName = "Level") int32 & lvl);
Result:

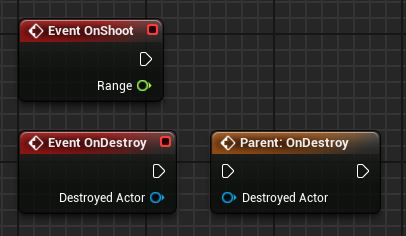
BlueprintNativeEvent vs BlueprintImplementableEvent
Use BlueprintNativeEvent if you want to include an optional native implementation for your exposed event
// .h

// I always use the prefix BPEvent_ to indicate that the body of the function
// will be defined within the Blueprint, but I don't want the prefix to show
// up inside the Blueprint. That's why I use the DisplayName meta-specifier

// the body for this function will be declared inside the Blueprint Editor
UFUNCTION(BlueprintImplementableEvent, Category = "Event", meta = (DisplayName = "OnShoot"))
  void BPEvent_OnShoot(float const& range);

// the native body for this function can(!) be called inside the Blueprint Editor
// otherwise it has no body like a BlueprintImplementableEvent
UFUNCTION(BlueprintNativeEvent, Category = "Event", meta = (DisplayName = "OnShoot"))
  void BPEvent_OnDestroy(AActor* destroyedActor);

// .cpp

  // for the declaration of your native body, add _Implementation to the function name
  void AMyClass::BPEvent_OnDestroy_Implementation(AActor* destroyedActor)
  {
    UE_LOG(LogTemp, Warning, TEXT("Call to native body of OnDestroy");
  }
Result:
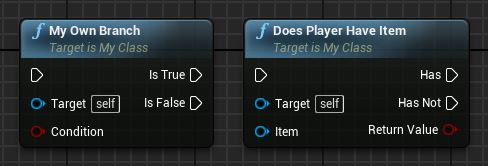
Multiple execution pins
The execution pins you see on a Branch node or a dynamic cast are based on enums. You can create your own functions with multiple execution pins on the output side
// .h
#include "InOut.h"

// First you need your enums
UENUM(BlueprintType)
enum class EBranch : uint8
{
  IsTrue,
  IsFalse
}

UENUM(BlueprintType)
enum class EHasItem : uint8
{
  Has,
  HasNot
}

UCLASS()
class AMyClass : public AActor
{
  // ...
  public:

  UPROPERTY()
    TArray<class AItem*> Inventory;

  public:

  // the meta specifier ExpandEnumAsExecs lets the execution pins show up in the Blueprint Editor
  UFUNCTION(BlueprintCallable, Category = FlowControl, meta = (Keyword = "if", ExpandEnumAsExecs="Branch"))
  	void MyOwnBranch(bool const& condition, EBranch & Branch);

  UFUNCTION(BlueprintCallable, Category = Inventory, meta = (Keyword = "has", ExpandEnumAsExecs="Has"))
  	bool DoesPlayerHaveItem(AItem* item, EHasItem & Has);
}
// .cpp

// to switch the branch, set the enum as the out-parameter's value
void AMyClass::MyOwnBranch(bool const& condition, EBranch & Branch)
{
    condition ? Branch = EBranch::IsTrue : Branch = EBranch::IsFalse;
}

bool AMyClass::DoesPlayerHaveItem(AItem* item, EHasItem & Has)
{
    for (auto& inventoryItem : Inventory)
    {
        if(inventoryItem == item)
        {
            Has = EHasItem::Has;
            return true;
        }
    }
    Has = EHasItem::HasNot;
    return false;
}
Result:
Further readings:
- Etos Videos
- Dynamic Delegate (C++)
- Component System (C++)
- CollisionManager for the MonoGame-Framework (C#)
- Pathfinding in the Console (C++)